

* You can purchase the INEXPENSIVE AD-FREE PDF of this pattern on Etsy! This printer friendly, stylishly formatted PDF includes all 3 tree sizes, a photo tutorial to help you create the textured ridge and is a total of 7 pages including the cover page. *
A couple of year ago, I came across a beautiful Anthropology Knit Tabletop Tree and immediately thought; I can make this. I saved the picture as inspiration and this year I decided to attempt making my own version in crochet.
I have crafted Christmas decor with my mom and grandma my entire childhood, so it feels special to add handmade pieces to my own home.
As the end of the year nears and the list of things to do in preparation for the holiday season gets longer, simple projects like this one add a little something special to the season without requiring a whole lot of time or supplies. The Evergreen Collection checks all those boxes.
These crochet tabletop trees are a fun way to bring a little handmade charm to your holiday decor. They look lovely grouped together on a mantel, tucked onto a bookshelf or styled as part of a holiday centrepiece.
The pattern includes three sizes: Petite, Classic and Grande, so you can make a little forest of your own. Even better, you can crochet all three sizes with just one skein of yarn!
Construction: The Evergreen trees are crocheted from the top down in continuous rounds, using an amigurumi-style construction. Once the tree shape is complete, you’ll switch to a larger crochet hook and work your way back up the tree with surface slip stitches to create the raised textured ridges that give each tree its distinctive look.

Skill level: beginner friendly
Materials:
Hook
- 7mm hook
- 9mm (M/N-13) hook (optional)
Notions
- Styrofoam cones in the following size:
- Petite: 2.75″ (6.9cm) x 6″ (15.2cm)
- Classic: 3.7″ (9.3cm) x 8.9″ (22.6cm)
- Grande: 3.8″ (9.6cm) x 11.9″ (30.2cm)
- Stitch markers
- Scissors
- Darning needle
Yarn
To make all 3 sizes, you will need an entire skein of Lion Brand Yarn Cover Story 300g yarn which is a Super Bulky/#6 weight chenille yarn. Pictures in this pattern show colours Hearthside and Driftwood.
More precisely, you will need:
- 33 yards (30.5m / 61g) for the petite size
- 57 yards (52m / 104g) for the classic size
- 74 yards (67.5m / 135g) for the grande size
Not ready to crochet just yet? Pin it so you can come back to it later!

Gauge: In sc: 4”x4” (10 cm x 10 cm) = 9 stitches across x 10 rows high.
Final measurements: The finished trees measure roughly:
- 8” in height by 4” wide for the petite size.
- 11.5” in height by 5” wide for the classic size.
- 14.5” in height by 5” wide for the grande size.
Notes:
- This pattern is worked in the round continuously, do not chain at the beginning of each round.
- I recommend using a stitch marker to mark the beginning of the round.
- The bottom of the tree is intentionally left open to accommodate the foam cone, which provides a sturdy, structured shape without the need for stuffing.

Abbreviations:
This pattern uses standard US crochet terms.
- Sc: Single crochet
- Mc: Magic circle
- St(s): Stitch(es)
- Inc: Sc increase (two sc in the same st)
- Sl st: Slip stitch
Pattern:

PETITE SIZE:
This size is meant to fit on a 2.75″ (6.9cm) x 6″ (15.2cm) styrofoam cone.
Tree Shape
Begin working with 7mm hook.
Round 1: Sc 6 in MC (6)
Round 2: Sc in each st around (6)
Round 3: [inc, sc in next st] x3 (9)
Round 4: Sc in each st around (9)
Round 5: [Sc 2, inc in next st] x3 (12)
Rounds 6-8: Sc around (12) (36 total sts)
Round 9: [Sc 2, inc in next st] x4 (16)
Rounds 10-13: Sc around (16) (64 total sts)
Round 14: [Sc 3, inc in next st] x4 (20)
Rounds 15-22: Sc around (20) (160 total sts)
Textured Ridge
We will now use surface slip stitches to create the raised ridges that give the tree its signature texture.
Begin working with 9mm hook OR continue very loosely with 7mm hook.
Fold the tree shape flat and place stitch markers every 4-5 rows along the fold on the left side. Repeat along the fold on the right side but this time placing the stitch markers roughly halfway between the markers on the left side (see photo tutorial below).
Sl st in the next stitch (where your beginning of round stitch marker is) then surface crochet slip stitches going around from stitch marker to st marker until you reach the top. Make sure to place at least two slip stitches in the first round at the top then fasten off. Using darning needle, pull the yarn inside the tree.

CLASSIC SIZE:
This size is meant to fit on a 3.7″ (9.3cm) x 8.9″ (22.6cm) styrofoam cone.
Tree Shape
Begin working with 7mm hook.
Round 1: Sc 6 in MC (6)
Round 2: Sc in each st around (6)
Round 3: [inc, sc in next st] x3 (9)
Round 4: Sc in each st around (9)
Round 5: [Sc, inc in next st] x4, sc (13)
Rounds 6-8: Sc around (13) (39 total sts)
Round 9: [Sc 2, inc in next st] x4, inc (18)
Rounds 10-14: Sc around (18) (90 total sts)
Round 15: [Sc 2, inc in next st] x6 (24)
Rounds 16-22: Sc around (24) (168 total sts)
Round 23: [Sc 5, inc in next st] x4 (28)
Rounds 24-28: Sc around (28) (140 total sts)
Textured Ridge
We will now use surface slip stitches to create the raised ridges that give the tree its signature texture.
Begin working with 9mm hook OR continue very loosely with 7mm hook.
Fold the tree shape flat and place stitch markers every 4-5 rows along the fold on the left side. Repeat along the fold on the right side but this time placing the stitch markers roughly halfway between the markers on the left side (see photo tutorial below).
Sl st in the next stitch (where your beginning of round stitch marker is) then surface crochet slip stitches going around from stitch marker to st marker until you reach the top. Make sure to place at least two slip stitches in the first round at the top then fasten off. Using darning needle, pull the yarn inside the tree.

GRANDE SIZE:
This size is meant to fit on a 3.8″ (9.6cm) x 11.9″ (30.2cm) styrofoam cone.
Tree Shape
Begin working with 7mm hook.
Round 1: Sc 6 in MC (6)
Round 2: Sc in each st around (6)
Round 3: [inc, sc in next st] x3 (9)
Round 4-5: Sc in each st around (9) (18 total sts)
Round 6: [Sc, inc in next st] x4, sc (13)
Rounds 7-10: Sc around (13) (52 total sts)
Round 11: [Sc 2, inc in next st] x4, inc (18)
Rounds 12-18: Sc around (18) (126 total sts)
Round 19: [Sc 5, inc in next st] x3 (21)
Rounds 20-24: Sc around (21) (105 total sts)
Round 25: [Sc 6, inc in next st] x3 (24)
Rounds 26-28: Sc around (24) (72 total sts)
Round 29: [Sc 5, inc in next st] x4 (28)
Rounds 30-38: Sc around (28) (252 total sts)
Textured Ridge
We will now use surface slip stitches to create the raised ridges that give the tree its signature texture.
Begin working with 9mm hook OR continue very loosely with 7mm hook.
Fold the tree shape flat and place stitch markers every 4-5 rows along the fold on the left side. Repeat along the fold on the right side but this time placing the stitch markers roughly halfway between the markers on the left side (see photo tutorial below).
Sl st in the next stitch (where your beginning of round stitch marker is) then surface crochet slip stitches going around from stitch marker to st marker until you reach the top. Make sure to place at least two slip stitches in the first round at the top then fasten off. Using darning needle, pull the yarn inside the tree.
Textured Ridge – Photo Tutorial
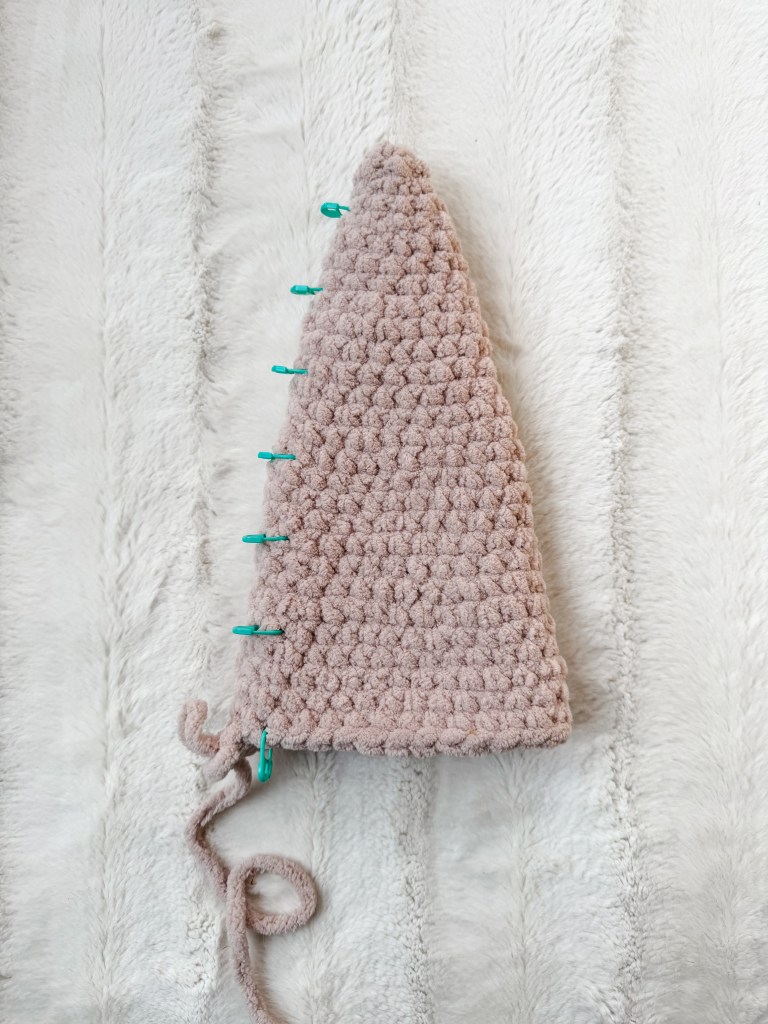
Fold your tree shape flat in half as shown and place stitch markers 4-5 rows apart along the fold on the left side.
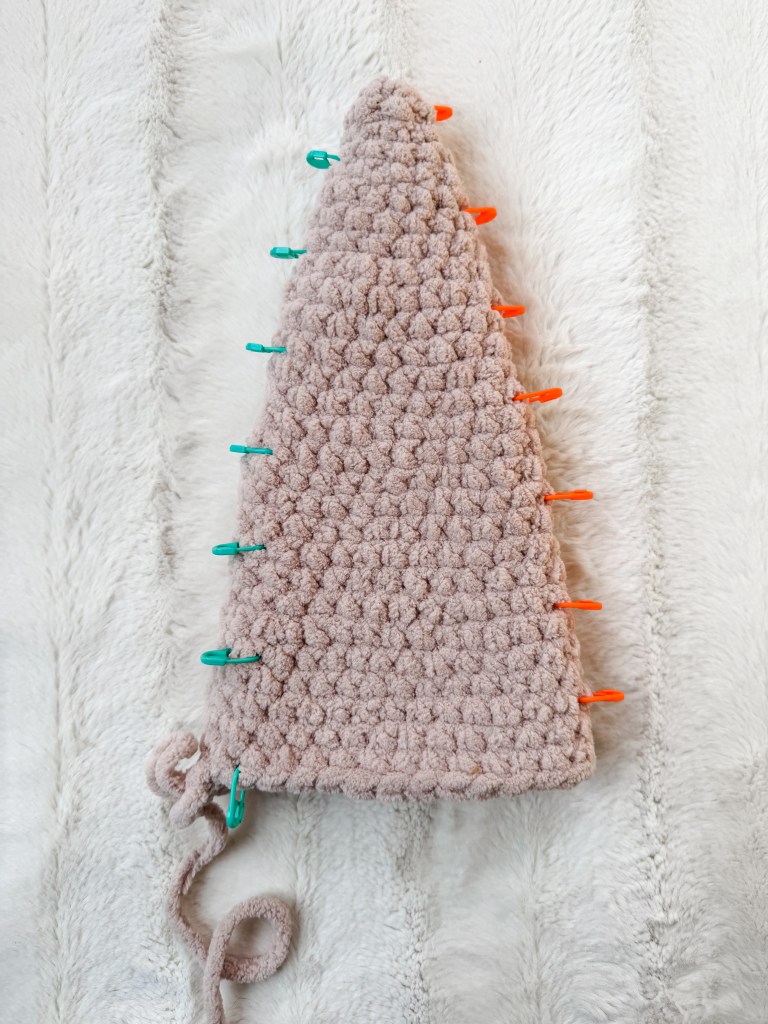
Repeat the same process along the fold on the right side but this time placing the stitch markers roughly halfway between the markers on the left side.
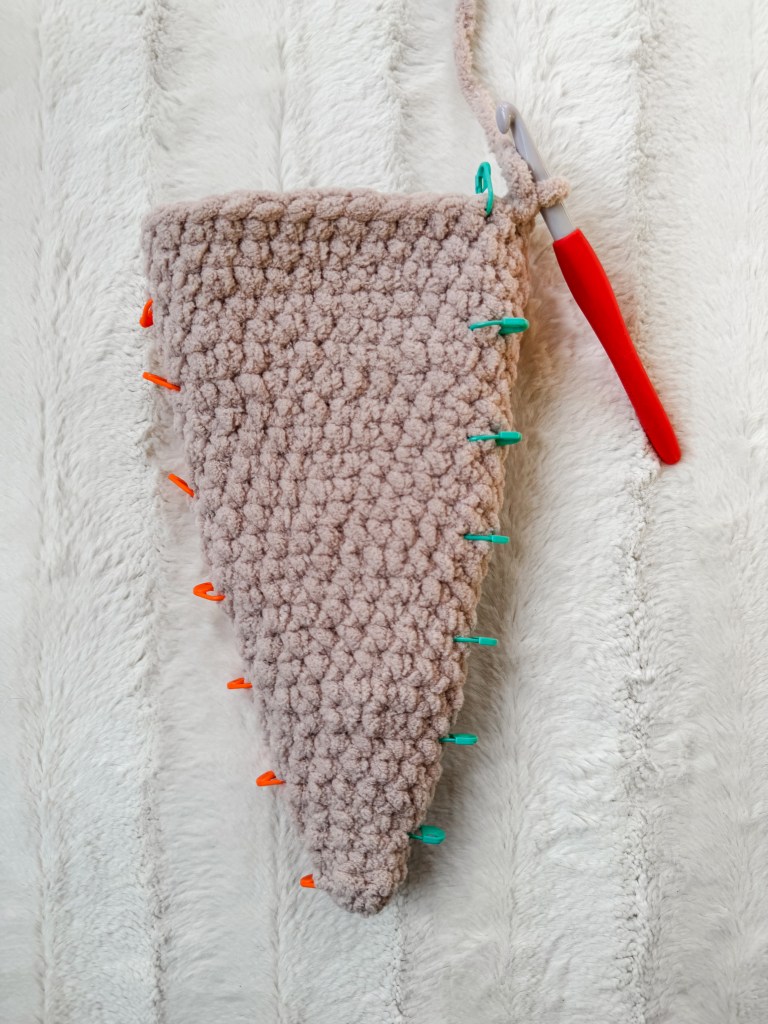
Turn your tree shape 180° and slip stitch in the next stitch (where your beginning of round stitch marker is).
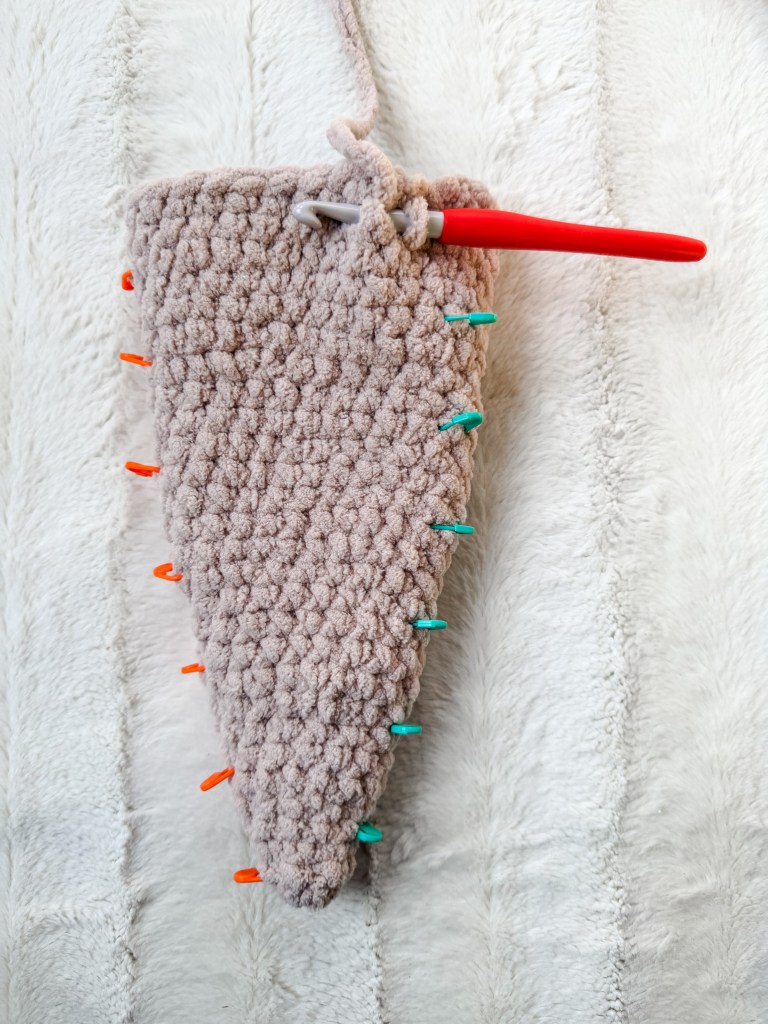
Surface crochet slip stitches (this mean you will be going below and around the stitches as shown above).
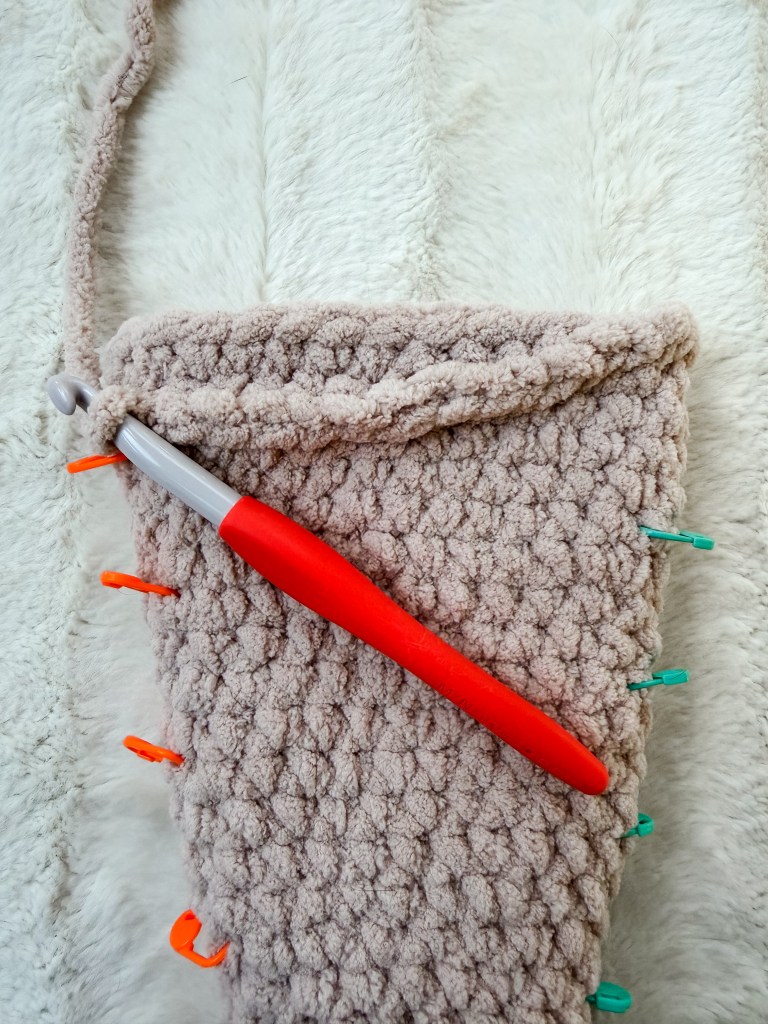
Surface crochet slip stitch toward the stitch marker on the opposite side, moving down rows as evenly as possible.
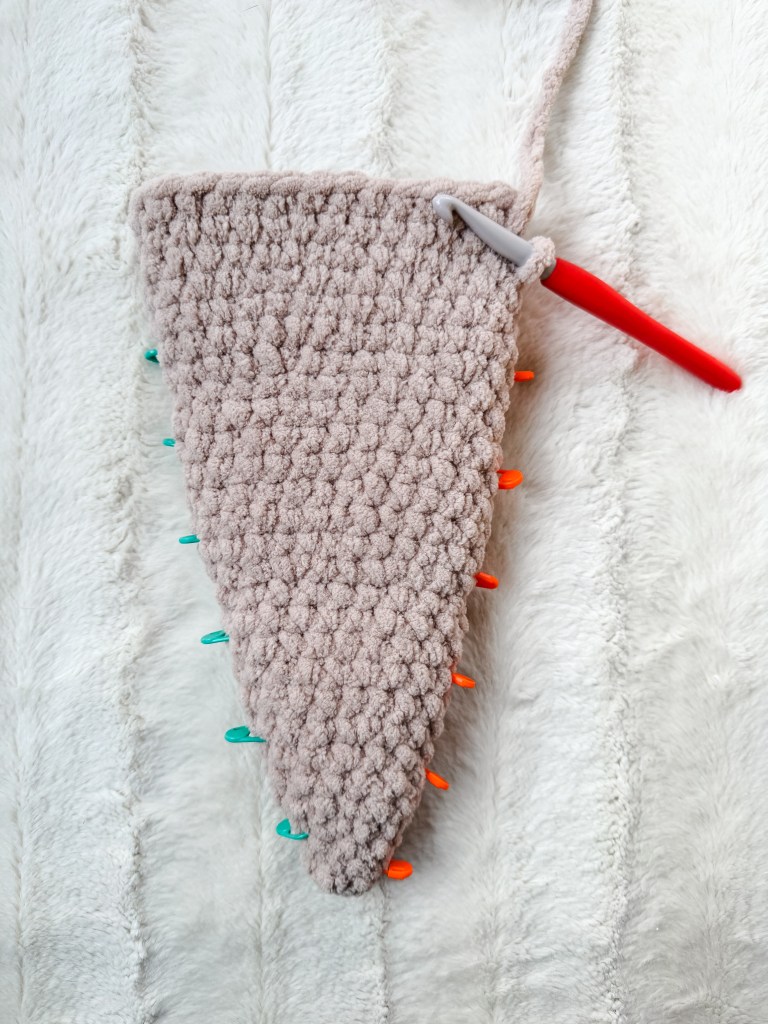
Flip the tree shape over and repeat the same process going around from st marker to st marker. Make sure to place at least two slip stitches in the first round at the top then fasten off.
Note: these pictures show the classic size, but the process is the same for all sizes.

The Cover Story 300g colours are perfect whether you want to complement your existing decor or have a little fun with it; from classic winter white, warm neutrals, evergreen green, or even a pop of festive colour, they would all look lovely.

Since the crocheted trees are simply slipped over the foam cones, changing your holiday color scheme is as simple as crocheting a new cover and reusing your foam cone. The unused covers can easily be stored flat which means they take very little room.

So, whether you’re looking to add a few handmade touches to your holiday home, use up a skein of yarn, or make a thoughtful handmade gift, the Evergreen Collection is a fun and satisfying project to add to your seasonal crochet list!

If you like this pattern, please share on social media using #EvergreenCollection and tag @KnitalieCo.
If you would like to purchase the INEXPENSIVE AD-FREE PDF of this pattern, here’s the link! Purchasing the printer friendly, stylishly formatted PDF helps me continue sharing free content.
Check out more crochet patterns



Leave a Reply